First we must grab the bundles we are changing and edit the code. For this example I grabbed the org.eclipse.debug.ui bundle from CVS and applied the latest patch for the new Debug Breadcrumbs feature Pawel is working on.
You must also set up your target platform (Window > Preferences > PDE > Target Platform) to be what your intended client is using. Your target platform will determine what feature version you are going to patch. Therefore, to create a patch against 3.4.1, make sure to set your target platform to a 3.4.1 install. In this example I am using my default target platform (the latest I build).
Note that at this point, we could use PDE to launch a runtime workbench and test out the changes immediately.
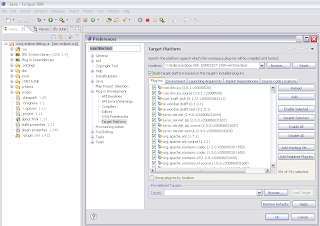
Now to create the feature patch, use File > New > PDE > Feature Patch. This brings up a wizard with multiple dialogs to fill in.
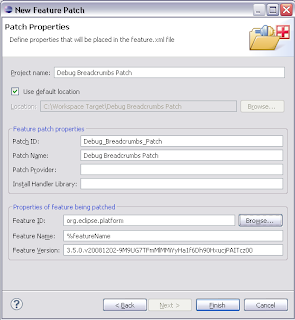
You will have to choose a project name which is the name of the project that will be created in your workspace. Then you must choose a patch ID and name, which will be what your user sees when they try and install the patch. Finally, you must choose the feature which you are patching. Hitting the browse button will allow you to select one of the features from your target platform, and the name and version will be filled in for you.
Hitting finish will bring up the feaure patch editor where you can edit many more things. For the simple case, we are going to move directly to the Plug-ins tab of the editor. Here, we will specify what new bundles the feature will have. Hit the Add... button and select your workspace bundle. You don't have to specify a version for the bundle because by default we will set the proper versions when we export.
 The next step is to export the patch. PDE provides a convenient button in the top right section of the editor which will open the export dialog. Choose a directory where you want to export (you can move this folder to a website later to make it available remotely). You can also export to a jar file.
 On this wizard it is also very important to go to the options tab and turn on the "package as individual jar archives" and "generate metadata" options. These options are required for p2 to be able to understand and install the patch.
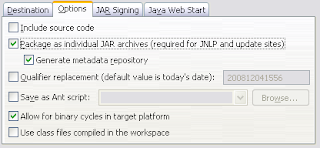
Hit the finish button, wait for the operation to complete and we're done!
To install the patch, we go to Help > Install New Software... Hit the Add Site button and select the directory we exported to (or the remote location, or the jar file). The dialog should now show our patch, check it and hit next to begin the install. You will have to step through a few pages to accept the license agreement.
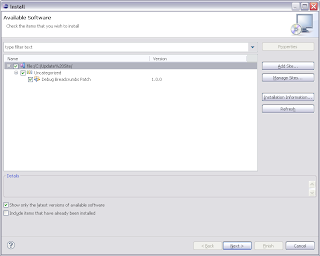
After the install completes, we are prompted to restart eclipse (highly recommended). When Eclipse returns, we have a brand new feature to play around with.
So there you go, the basics of creating a feature patch!
Optional: Instead of exporting the patch directly, you can also use an update site project with a site.xml to deliver the patch. Simply open an existing site.xml or create a new site project (File > New... > PDE > Update Site Project), hit the add button, select your feature patch project, and build the site. Using a update site project will generate an html page as well as allow the pre-p2 update manager to access the site.
One think you missed is where you got the source from. Does this have to come from CVS (or something that supports "creating a patch" from), or can I import bundles (with source) from my target?
ReplyDeleteHow is this different from the currently available "New Plug-in Fragment" project creation wizard.
ReplyDeleteGreat tutorial !
ReplyDeleteAbout your question sud: You need to create a Feature Patch when you want to install the feature throw p2 which is already installed in your bundle, such as an update.
I have a question too:
The patch enables to avoid the error message "Cannot find a solution where both Match" with p2 installation. Is there a way to avoid this message when you try to update an existing feature with the update button ? Thanks
Ian, in theory, yes importing as source would work. If you can get the imported plugin to compile correctly, and the correct settings are in the build.properties file, PDE would treat your code the same as it would if it were grabbed via CVS. The problem is that importing doesn't always get everything perfectly right, but we do our best :)
ReplyDeleteSud, feature patches are used to replace parts of the code in an existing feature. Fragments can be used to provide custom implementations of libraries in plug-ins (which may or may not be part of a feature). Fragments are for providing multiple implementations (for each OS for example), not for modifying existing code.
Emilien, everything in p2 has 'required capabilities' that define what it needs and what it can work with. p2 does its best to install/update each piece in a way that completely satisfies every required capability. It is easy to try and install something that can't be completely satisfied, resulting in your "Cannot find..." problem. The only way to avoid it, is to make sure the features you are working with are using the correct version. Features, at least in the SDK, have a specific version, and have requirements on specific versions of bundles (vs bundles which can easily define version ranges). So it is easy to have the incorrect version when working with features. Sorry that this isn't much help, p2 is working towards better problem reporting.
Hello,
ReplyDeleteI am having some trouble installing a feature patch. So I want to create a patch for org.eclipse.cdt.debug.mi.core plugin for eclipse SDK 4.2.2 (Juno sr2). I have imported the plugin in my workspace, made the necessary changes and also changed the patch version in the MANIFEST.MF file.
I then created the Feature Patch for Feature ID: org.eclipse.cdt.gnu.debug and added the modified plugin in the Plug-ins tab. I then exported the Feature Patch using Deployable features and I have set the Options as explained in this tutorial. The corresponding feature and updated plugin jars were generated.
The problem is when I try installing it via the Install New Software Option. I choose the feature jar file but I get the following message: "No software site(repository) found at jar". What am I doing wrong?
I would also like to patch the org.eclipse.cdt.debug.mi.core.source in order to be able to make further modifications if needed. I was able to generate it when exporting the Feature Patch, but in order to patch it as well, should I create a second Feature Patch for Feature ID: org.eclipse.cdt.gnu.debug.source?
Thanks
Hello,
ReplyDeleteI have managed to install the feature patch, (without changing the og.eclipse.cdt.debug.mi.core version), but the old plugin was not replaced by the new one. Any suggestions as to how I can fix this?
Thanks
Some truly wonderful content on this web site , thankyou for contribution. web page
ReplyDelete