So it appears that the Eclipse-based Bespin server created by Boris Bokowski and Simon Kaegi has made it to Slashdot. The comments there reflect my feelings on the whole 'IDEs in the Cloud' concept. It's definitely new and interesting, but how will it be useful to me?
Looking forward to see how this develops in e4.
Thursday, February 19, 2009


Tuesday, February 03, 2009
Debugger Breadcrumb
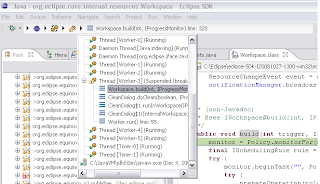
In 3.5M5 Eclipse Platform introduces a Breadcrumb feature in the Debug view. Since it's a platform feature it is automatically available with JDT, CDT, or any commercial debugger built on the Eclipse framework. To see the breadcrumb, simply resize the Debug view to make it really short (about one line of text), and the view will automatically switch.
We hope that this feature will make it easier for users to stay in their regular development perspective for majority of their debugging tasks. For example here's a screen shot of the C/C++ perspective with the Debug view breadcrumb above the editor.

If you'd like to try debugging outside of the Debug perspective, there are two things you need to do:
We hope that this feature will make it easier for users to stay in their regular development perspective for majority of their debugging tasks. For example here's a screen shot of the C/C++ perspective with the Debug view breadcrumb above the editor.

If you'd like to try debugging outside of the Debug perspective, there are two things you need to do:
- Disable the automatic switching of perspective when debugging happens. Go to Window->Preferences->Run/Debug->Perspectives and select Never for both of the options that start with Open associated perspective...
- Enable view management in your development perspective. Go to Window->Preferences->Run/Debug->View Management and select the check-box for your perspective. This will cause Variables, Breakpoints, and other debugger views to automatically appear and disappear when you need them.
Thursday, December 18, 2008
Debug Unit Tests
There was a recent blog post asking whether the debug framework had any unit tests and if so, where we were hiding them. Yes we do have a test suite to help protect against regressions and we hide it in the org.eclipse.jdt.debug.tests plug-in.
The majority of the tests require some implementation of the debug framework to run. We are responsible for the JDT Debugger, which is part of the SDK and implements the majority of the standard debug model. So the tests were designed to use JDT.
Until Dave brought the idea up, I had never thought of anyone using unit tests to help implement their own debugger. The current tests certainly are not set up for this style of development. I think it would be really cool to have a generic testing harness that checks the behaviour of the framework. Users could have the test harness run against their implementations of the debug interfaces/extensions. Perhaps Bug 259145 could evolve into something like that.
The majority of the tests require some implementation of the debug framework to run. We are responsible for the JDT Debugger, which is part of the SDK and implements the majority of the standard debug model. So the tests were designed to use JDT.
Until Dave brought the idea up, I had never thought of anyone using unit tests to help implement their own debugger. The current tests certainly are not set up for this style of development. I think it would be really cool to have a generic testing harness that checks the behaviour of the framework. Users could have the test harness run against their implementations of the debug interfaces/extensions. Perhaps Bug 259145 could evolve into something like that.
Thursday, December 04, 2008
Delivering Feature Patches - Part II
This post will go over the basics of creating a Feature Patch, the most robust option when wanting to deliver some code changes, as discussed in my previous post.
First we must grab the bundles we are changing and edit the code. For this example I grabbed the org.eclipse.debug.ui bundle from CVS and applied the latest patch for the new Debug Breadcrumbs feature Pawel is working on.
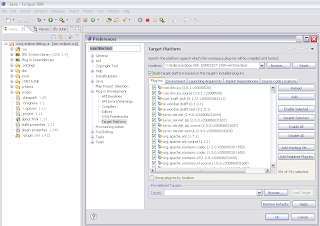
You must also set up your target platform (Window > Preferences > PDE > Target Platform) to be what your intended client is using. Your target platform will determine what feature version you are going to patch. Therefore, to create a patch against 3.4.1, make sure to set your target platform to a 3.4.1 install. In this example I am using my default target platform (the latest I build).
Note that at this point, we could use PDE to launch a runtime workbench and test out the changes immediately.
Now to create the feature patch, use File > New > PDE > Feature Patch. This brings up a wizard with multiple dialogs to fill in.
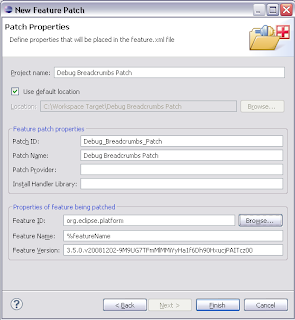
You will have to choose a project name which is the name of the project that will be created in your workspace. Then you must choose a patch ID and name, which will be what your user sees when they try and install the patch. Finally, you must choose the feature which you are patching. Hitting the browse button will allow you to select one of the features from your target platform, and the name and version will be filled in for you.
Hitting finish will bring up the feaure patch editor where you can edit many more things. For the simple case, we are going to move directly to the Plug-ins tab of the editor. Here, we will specify what new bundles the feature will have. Hit the Add... button and select your workspace bundle. You don't have to specify a version for the bundle because by default we will set the proper versions when we export.
 The next step is to export the patch. PDE provides a convenient button in the top right section of the editor which will open the export dialog. Choose a directory where you want to export (you can move this folder to a website later to make it available remotely). You can also export to a jar file.
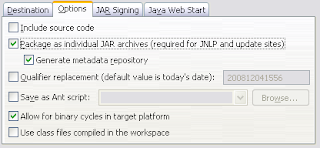
 On this wizard it is also very important to go to the options tab and turn on the "package as individual jar archives" and "generate metadata" options. These options are required for p2 to be able to understand and install the patch.
Hit the finish button, wait for the operation to complete and we're done!
To install the patch, we go to Help > Install New Software... Hit the Add Site button and select the directory we exported to (or the remote location, or the jar file). The dialog should now show our patch, check it and hit next to begin the install. You will have to step through a few pages to accept the license agreement.
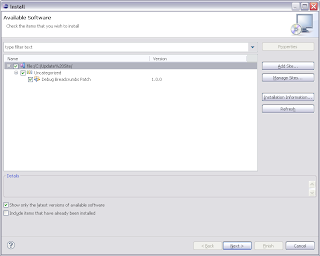
After the install completes, we are prompted to restart eclipse (highly recommended). When Eclipse returns, we have a brand new feature to play around with.
So there you go, the basics of creating a feature patch!
Optional: Instead of exporting the patch directly, you can also use an update site project with a site.xml to deliver the patch. Simply open an existing site.xml or create a new site project (File > New... > PDE > Update Site Project), hit the add button, select your feature patch project, and build the site. Using a update site project will generate an html page as well as allow the pre-p2 update manager to access the site.
First we must grab the bundles we are changing and edit the code. For this example I grabbed the org.eclipse.debug.ui bundle from CVS and applied the latest patch for the new Debug Breadcrumbs feature Pawel is working on.
You must also set up your target platform (Window > Preferences > PDE > Target Platform) to be what your intended client is using. Your target platform will determine what feature version you are going to patch. Therefore, to create a patch against 3.4.1, make sure to set your target platform to a 3.4.1 install. In this example I am using my default target platform (the latest I build).
Note that at this point, we could use PDE to launch a runtime workbench and test out the changes immediately.

Now to create the feature patch, use File > New > PDE > Feature Patch. This brings up a wizard with multiple dialogs to fill in.

You will have to choose a project name which is the name of the project that will be created in your workspace. Then you must choose a patch ID and name, which will be what your user sees when they try and install the patch. Finally, you must choose the feature which you are patching. Hitting the browse button will allow you to select one of the features from your target platform, and the name and version will be filled in for you.
Hitting finish will bring up the feaure patch editor where you can edit many more things. For the simple case, we are going to move directly to the Plug-ins tab of the editor. Here, we will specify what new bundles the feature will have. Hit the Add... button and select your workspace bundle. You don't have to specify a version for the bundle because by default we will set the proper versions when we export.
 The next step is to export the patch. PDE provides a convenient button in the top right section of the editor which will open the export dialog. Choose a directory where you want to export (you can move this folder to a website later to make it available remotely). You can also export to a jar file.
 On this wizard it is also very important to go to the options tab and turn on the "package as individual jar archives" and "generate metadata" options. These options are required for p2 to be able to understand and install the patch.
Hit the finish button, wait for the operation to complete and we're done!
To install the patch, we go to Help > Install New Software... Hit the Add Site button and select the directory we exported to (or the remote location, or the jar file). The dialog should now show our patch, check it and hit next to begin the install. You will have to step through a few pages to accept the license agreement.

After the install completes, we are prompted to restart eclipse (highly recommended). When Eclipse returns, we have a brand new feature to play around with.

So there you go, the basics of creating a feature patch!
Optional: Instead of exporting the patch directly, you can also use an update site project with a site.xml to deliver the patch. Simply open an existing site.xml or create a new site project (File > New... > PDE > Update Site Project), hit the add button, select your feature patch project, and build the site. Using a update site project will generate an html page as well as allow the pre-p2 update manager to access the site.
Subscribe to:
Posts (Atom)