So what is a target platform?
At its core, a target platform is a collection of plug-ins (aka bundles) that PDE can use to compile against, launch with, lookup information in and more. When developing a bundle it is almost guaranteed that you will depend on other bundles. While you can have the complete required set of bundles in your workspace, it clutters the navigator views and degrades performance. The target platform provides an easy way to manage the bundles you build against.
The target platform is used for the following in PDE:
- Compile - Plug-ins in the workspace are built against the target platform so you do not have to have everything in your workspace
- Launch - When using PDE's launchers you can choose the set of plug-ins you want to launch. By default the Eclipse Application Launcher will start with all plug-ins in the target, but will use workspace plug-ins instead when available
- Calculate Dependencies - PDE assists you in finding the plug-ins your plug-ins was include/require to compile correctly by looking at what is available in the target platform
Where do I edit the target platform?
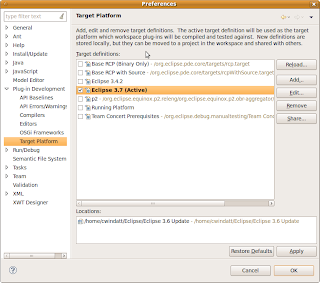
The target platform is managed on the PDE > Target Platform preference page. When you go to that page (3.5 and later) you will see a list of all the target definitions you have available with the current target platform bolded. PDE only has a single active target platform that all bundles in the workspace use (this might change someday).

However, you can have multiple target definitions. A target definition describes the contents of a target. You can select any target definition as the target platform and that is what PDE will build against. For users who only build one product, you only need to create and modify a single definition, but users who develop different applications (or different versions of the same application) in the same workspace will find that having multiple target definitions makes it easy to switch modes.
How do I create a target?
To get started, go to the preference page and hit add to create a new target. There are some options to create targets from existing templates, but for now select Nothing and hit next.
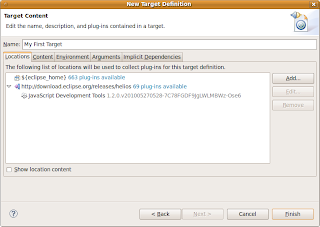
There are many options when setting up a target, but only a few are needed for basic setups. The first step is to give the target definition a name so we can recognize it later.

The important parts of a target definition is its locations and its content. The locations define where the target should find bundles, the content defines which bundles from the location to take.
On the locations tab you can add 4 types of locations. A directory will just collect any bundles found in the directory you point it to. An installation will treat the location as an Eclipse application. Rather than just looking in a directory, the installation location will consider link folders, a platform.xml if the app uses update manager, or a bundles.info file if the app uses p2 (simple configurator). A feature location will add a single feature and its included bundles to the target. Finally, a software site location will allow bundles to be retrieved from a local or remote update site or p2 repository.
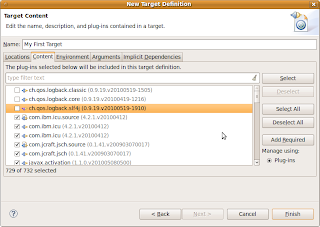
The content tab is only important if you need to limit the bundles in the target. For plug-in developers this step is unecessary, but for RCP developers it can be more important. This article explains the reasoning. The content tab will list all the bundles in the target, along with check boxes to remove them. The tab also provides a number of ways to filter the list so you can quickly remove certain types.

One internal detail that target platform users may want to know is that when bundles are unchecked, the remaining list of bundles is stored as an include list, independant of the locations. This was a change from the <3.5 style="font-style: italic;">share
What other features use targets?
The Target Platform State View can be used to see what is in your target.
Add new content to your target on the fly.
You can export the contents of your target platform.
Manage your target contents using features.
Add the target platform to the java search path.
What is in the future for targets?
In 3.7 there have been multiple improvements around software site (p2) based targets, including improved resolution performance and better offline support. PDE's API Tooling features already leverage some of the target code, but hopefully in the near future there will be even better integration.
Expect another blog post soon explaining more about how p2 targets work.
No comments:
Post a Comment